
FAQS
Can you explain the dimensions of the decals?
Do you accept returns or exchanges?
The following items can't be returned or exchanged
- Custom or personalized orders
- T-shirts
- Wall Prints
- Decals that are destroyed or damaged due to application issues will not be refunded.
Returns and exchange details
**If an item is being returned and/or exchanged due to our mistake, we do waive the restocking fee and cover shipping.**
We highly encourage ordering sample color swatches and/or sample application decals to test the colors and vinyl in the space you plan to use the decals. After purchasing a decal, please do not hesitate to contact us,as we will do everything in our power to work with you to solve any issues that might arise.
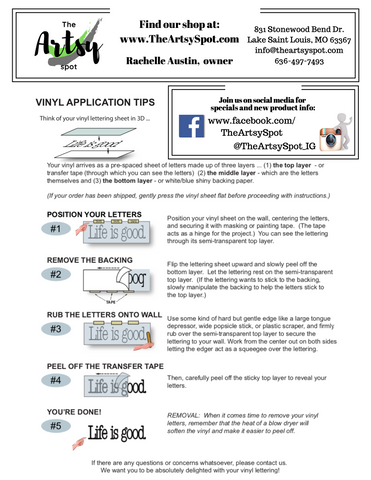
How do you apply decals?
We send detailed application instructions on the back of your invoice with your purchase. Here is the document as well in case you didn't receive or threw it away:
How long will it take my item to arrive?
For decals, coffee mugs, tumblers, and most items in our shop, processing times are 1-5 business days.
For Shirts and Wall prints, we use a print partner so the processing times are a little longer (typically 2-7 business days unless there is a stock issue which occasionally happens due to the pandemic).
We mainly ship First Class or Priority Mail within the United States. Once shipped, packages may take from 2 to 5 business days on average to arrive, (1-3 days with Priority Mail) depending on your location (ie: a package moving across the country may take longer than 2 days to arrive). Shipping times may vary throughout the year, depending on peak shipping seasons. The Artsy Spot is not responsible for carrier transit times and during the pandemic, shipping times are a little more unpredictable.
Can you tell me more about applying decals?
BEFORE ORDERING: make sure your walls are ready and able.
Our vinyl will work best on enamel painted walls that are allowed to cure for at least three weeks. If you have recently painted your walls, we suggest you wait at least 3 weeks before putting up the decal, as applying the decal before the wall is 100% set can make it difficult for the decals to stick.
The vinyl manufacturer suggests smooth, semi-gloss or gloss enamel paints are best for vinyl application. If possible avoid Latex paints and paints that include stain-blockers or anti-graffiti ingredients, as these will repel the vinyl adhesive.
Most all current vinyl manufactures suggest customers should avoid using VOC Free paint*. As the ingredients in VOC free paints will resist the decal from adhering properly. Successful results of decals on low/free VOC paint surfaces cannot be guaranteed.
*(common VOC free paints include: Yolo Colorhouse, Behr Premium Plus Zero VOC, Benjamin Moore’s Natura® paint, and Glidden Spred®. Sherwin Williams offers several such paints including GreenGuard Emerald Interior Acrylic Latex, Harmony, Pro Industrial Zero VOC Waterborne Catalyzed Epoxy, Pro Industrial Zero VOC Acrylic Coating, and ProMAR 200 & 400 Interior Latex paint).
GENERAL INFORMATION
The Artsy Spot only offers Cut Decals - a cut decal is a die-cut shape made from one of our many color options (can be seen on our color chart). We have both matte and metallic colors. If a design has multiple colors, each color will be a separate piece to install.
The decals are cut from colored vinyl and then packaged in transfer paper - so technically each piece is separate, but it will come on a single sheet of transfer paper - so once it is on the wall, it won't have a clear background connecting it all, they will just look like individual pieces that are painted on the wall.
Our decals are cut from colored vinyl, so we are limited to the colors in our color chart, and we are not able to do photo elements, gradients, or text/details that are extremely small.
LIFESPAN OF DECALS & STORAGE:
Our vinyl is a 3-year film, removes cleanly and easily for up to 2 years after application and has a matte surface that suppresses unwanted reflection. It's an ideal choice for temporary, short-term, and medium-term indoor graphics.
If you are going to store your decal for a while before installing it, keep it in a clean, dry, temperate area (no extreme heat or cold) and if possible laid out on a flat surface. But don't wait too long to install, as the longer the vinyl sits packaged in the paper backer and transfer tape the stronger the vinyl will adhere to the packaging and be trickier to install flat and smooth!
INSTALLATION INFO:
Our decals can be applied to Hard, Flat, and Non- Porous surfaces. Installation to any other surfaces is not recommended. Be sure the surface temperature is not lfreezing to the touch, as decals will initially stick to a cold surface, but slowly peel away. If the decal is applied to a moderate temperature surface they will hold through
temperature changes. The Surface Temperature needs to be between 60°F and 90°F, with 70°F to 80°F being the ideal range for installation. Also, watch for walls that back up to cooling systems, water pipes, overhead windows or windows that have been boarded up. These areas are prone to condensation that may not be obvious at the time on installation.
Our decals will install very well on glass and car glass - they will hold firm and peel off when you are ready to change your design!
When you pick the space for your decal, cleaning the surface with a solution of 1 teaspoon of Dawn Dish Soap with one gallon of water, then mist the application area prior to installation, and wait until the surface is completely dry! You could also use rubbing alcohol to clean an area. This cleaning set is to clear away even some of the tiny oil residue not seen on the wall that might keep the decal from sticking correctly. Glass cleaners or other ammonia-based products are not recommended for this purpose, even with glass installations.
Make sure you are positive about the spot you pick for your decal, as the vinyl decals are a one-time use product. If you are able to peel your decal off the wall with out stretching or ripping you can try re-applying it in a new spot, but we cannot guarantee it will apply smoothly or hold firm.
If you are having difficulty getting the vinyl part of the decal to peel off with the transfer paper, try laying out the decal on a hard surface and rolling a metal can (such as a hairspray can), or a flat metal object firmly over the transfer paper side of the decal to get the vinyl to stick on the transfer paper for application. Also check out the 'flip-tip' method (http://www.signwarehouse.com/blog/oracal-flip-tip/).
**TIP: Fold the paper backing back against itself, and with one hand pressing down on the transfer paper, remove the paper backing. Remember to avoid pulling the paper backing up and away from the transfer paper. This will cause your decal to lift from the transfer paper, and in some cases, even rip. Always remove the paper backing while maintaining it folded back against itself. Part of the decal is coming off with the paper backing? Simply press that part of the decal back onto the transfer paper using the paper backing. Then repeat the process again, slowly, pressing that part of the decal down as needed while removing the paper backing. Decals that have thinner parts, such as the quotes, will require more time to remove the decal from the paper backing. The larger decals have a wider area of vinyl to help them stay on the transfer paper during the peeling process, while the decals with smaller parts do not.**
Video of the described method above:
If your decal is highly detailed, has many layers, or has lettering, we highly recommend trimming the large piece of transfer paper you received into smaller separate pieces. You can trim your decal design in to smaller pieces to apply, just remember not to cut through the vinyl!
*TEXTURED WALLS*
If your wall has any sort of texture, using a tennis ball to rub in the decal to the wall can help press the adhesive side into all the little dips and bumps on the wall to get a clean adherence of the decal. We do not recommend using vinyl decals on highly textured surfaces. We cannot guarantee the vinyl will work on every type of texture, so we highly encourage ordering a sample decal to apply on the surface you have in mind.
Don’t worry right away if you up with some bubbles in your decal job. Small bubbles will go away in time (the film breathes, and will flatten out after a few weeks at an appropriate temperature). If you want to work on the bubbles immediately, apply moderate heat, then poke them with a pin, pressing the film down with your thumb immediately afterwards.